Saturday, September 17, 2011

My Sheri Crafts - Sew Simple


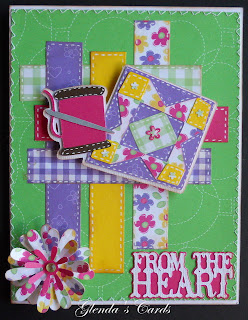
Hi and thanks for visiting today! Today begins a fun challenge at My Sheri Crafts with "Sew Simple"! We are adding sewing to our projects. This can be real or faux stitching. I am playing with a sketch from Page Maps. I liked the design with the strips of paper on the background and thought this would add to my sewing theme.
My card is 5" X 6 1/2" white cardstock and is layered with a stitched-look paper from Martha Stewart. Again, I am happy that I was able to incorporate papers from my scrap stash!
Cricut Cartridge: Country Life
Page 65 - Quilt cut 2".
Page 67 - Phrase - From my Heart cut 1".
Martha Stewart Punches
Embossed Pop Up Daisy and Layering Daisy for the large flower
Flower Shower - I added small flowers to the center of the yellow blocks and the green check block on the little quilt....My quick applique!!
Edges of the green background paper are sewn with the sewing machine and Gelly Roll pen for the faux stitches. Quilt is pop-dotted on the card.


Now it is your turn to show off your stitching! Our challenges run for two weeks. Deadline for entry will be midnight CST Sept. 30. We look forward to seeing your projects! Remember a winner is chosen to be the guest designer for the next challenge and "Ooh La La" awards are selected too!

Monday, September 12, 2011

Fantabulous Cricut Challenge # 77 -- Make Some Music

For my Paper Playtime Design Team post, please scroll down to the next post!


Thanks for stopping by today! Today begins a new fun challenge at FCCB. Challenge #77 is Make Some Music. We are asked to make a project with an instrument or music notes on it! I had a lot of fun with this card and I was able to include an instrument and music notes!
The card is 5" x 6 1/2" and is layered with a designer paper from The Paper Studio "Girls Live To Rock" paper pack. I like this bright paper with the music notes! All patterned papers are from this paper pack.
Cricut Cartridge - All the cricut cuts are from Groovy Times.
Page 53 - Guitar is cut 3 1/2" using the regular, layers, and shadow features.
Page 53 - Rock On is cut 1" using the phrase feature.
Page 44 - Music Notes are cut at 1" using the shift key on Layer 2 feature.
White mat is cut 3 1/2" x 4 1/4" and the yellow/pink mat is cut 3 3/4" x 4 1/2" using a hand cutter. I embossed the white mat using the Cuttlebug Allergo folder. Guitar is pop-dotted on mat.

Now it is your turn to play along with us. Your project must include an instrument or music notes! As always, remember you must include a Cricut cut! Have fun and Make Some Music!
Hope you enjoy my groovy card!

Paper Playtime - Challenge #55 - Make an Easel / Pedestal Card


Hi and thanks for visiting today! It is time for another fun challenge at Paper Playtime. This week Challenge # 55 is Make an Easel/Pedestal Card. If you have never tried an easel card and would like to learn how to make one, you are in for a treat! We are happy to have Mary of Cardz TV as our special guest designer today. Mary will share a great tutorial on making an easel card. Recently I found another great tutorial by Mary at CardzTV for making a Twisted Easel card. I enjoy making this style card and will be sharing a Twisted Easel card with you today.

Cricut cartridge: Forever Young for all the cuts.
Page 42 - Emblem feature for Model 19 Silhouette. Shift key used for the pink mat. Each cut is 3".
Page 73 - Flower 10 cut 1 1/2" using the main and layer features.
Page 43-  Emblem feature using shift for the pink mat. This is cut 3 1/4" and run through the Cuttlebug with the Swiss Dots embossing folder. I cut two of these and glued together for stability. The mat is pop-dotted on the base of the card. This will help to keep the front of the card in place.
Page 42 - "Fashion Queen" is cut 1 1/4' using the Word feature. Non-shift and shift key for the two colors.
Papers are from a Recollection 24 Page Pack from Michael's. I love this paper and thought it would be perfect for my Fashion Queen! Martha Stewart inking. Pearls and gemstone from my stash.


We would love for you to play along with us at Paper Playtime! We have a great prize for one winner this week. Our sponsor is K Andrews Design with Fashionable Friends Stamp Set!  How exciting is that! We look forward to seeing your easel / pedestal cards!

Sunday, September 4, 2011

My First Machine Stitched Card


Hope everyone is having a great weekend! We have been getting some much needed rain in my area. Just hope we do not get as much rain as predicted  in some areas which could cause flooding. This summer has been such a hot and dry one! Temperature in the upper 70's today is much better than those 100 degree days!

I have seen beautiful cards with machine stitching and after I saw the challenge at Celebrate the Occasion, I decided to uncover my sewing machine. The challenge is to follow a fun looking sketch.  


My folded card measures 4 1/4 x 5 1/2 and is cut from brown Bazzill paper. I used two K&Company patterned papers on the front of the card. Again, I am trying to use some of my scrap papers! The beige patterned paper is run through the Cuttlebug using the Script folder. I love the way the embossing looks on a patterned paper! I glued the two pieces on top of the card base (being carfeul not to get glue at my stitch line). Then the fun started! I had trouble with the tension adjustment, but finally was able to maintain a fair looking stitch. Lace is from my stash which is also stitched on the card. I had more tension problem--the machine and me! I decided to glue the pleats first and then proceeded to stitch.

Cricut cartridge: Paisley.
Page 59 - Flower is the button feature. It is cut at 1 3/4", 1 1/2", 1 1/4" and 3/4" from varying K&Company scrap papers. Flower edges are inked and then rolled under a bit with a tiny brush applicator. Each flower layer is pop-dottted. A light green pearl is used in the center.
Page 52 - "Love ya" is cut at 1" using word/word (no shift) and again in the green paper using the shadow/word shadow (shift).
   

Hope you enjoy my card!

Saturday, September 3, 2011

My Sheri Crafts Ch#68- Special Delivery


Thanks for stopping by today! Are you ready for another fun challenge at My Sheri Crafts! First let me say Thank you to all who entered in our last challenge--wonderful projects! Congrats to the winners!
Now to this week's challenge. Challenge #68 is Special Delivery. The expectation and birth of a precious child is always a blessed event. Today we are saying congratulations to our design team member Peachy who is looking forward to being a new Mommy!

I always enjoy trying different folds and styles of card and I decided to try a Dresser Side Step Card. I followed Jackie Topa's great tutorial on You Tube. You can also visit her at Addicted to Stamping. She has the video on the sidebar. Thanks Jackie for sharing your talents with us.

The card starts with a piece of 5 1/2" x 8 1/2" white cardstock. I am using colors of blue and yellow for a little boy. Ok, I had to add a bit of pink! I am using my new Cricut Wrap It Up Cartridge for my cuts. This cartridge has some great cuts and I know I will enjoy playing with it.
Page 53 - Onesie cut 2 1/4"
Page 63 - Stork cut 2 1/2"; Phrase feature "Congratulations" cut 2 1/4". I did not use the little stork that is also cut with the phrase.
Page 33 - Phrase feature- "It's  a Boy" cut 2 1/4"


For the cut out effect on the dresser, I used EK 1" circle punch by placing it slightly on the paper. I do not have the punch that Jackie Topa used, but I love it and need to find it! I added a little sticker to the onesie from my sticker stash. The drawer pulls are tiny white heart brads. Of course, lots of inking!

Photo of inside the card

Now it is your turn to join us in the challenge! We look forward to seeing your pretty paper projects. Remember you have two weeks to enter!
Hope you enjoy my card!